
Product Support
These daily tips can help you take care of your insulin pump, so it takes care of you!
- Keep it secure: If your pump touches your skin, turn the buttons away from your body to reduce long term exposure to sweat, lotions etc. Consider a waist pouch while exercising.
- Gentle button pushing: When pushing the buttons on your pump, use the side or pad of your finger. Try to avoid sharp objects like keys or the tips of long or acrylic fingernails.
- To see tips on caring for your MiniMed™ 780G insulin pump, please click here.
The Temporary (Temp) Basal rate feature for use in Manual Mode, lets you immediately increase or decrease your basal insulin for the period of time (duration) that you set. It is often used for exercise and sick days. A Temp Basal rate can be set in either Percent (delivers a percent of the current basal rate) or by Rate (delivers the amount that you enter). Follow these pump screen instructions.
While in SmartGuard™ technology, you may want to set a temporary sensor glucose (SG) target (Temp Target) of 8.3mmol/L for situations in which you would like your target to be temporarily higher, such as exercise. Check with your healthcare team regarding use of a Temp Target.
Note: The auto correction feature is not active during an active Temp Target. It will resume after the Temp Target is complete. Learn how to set a Temp Target in SmartGuard™ technology.
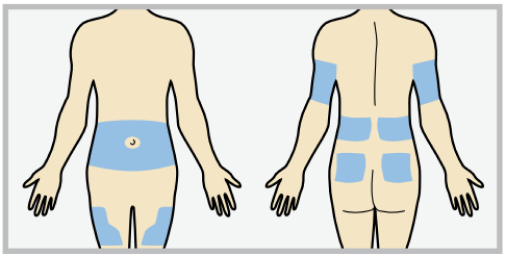
If you have trouble choose an insertion site from the shaded areas shown here.
Please refer to the resources below based on the infusion set you use:
Please refer to the resources below:
If your pump clip breaks, you can request a replacement at no charge by calling the Global Helpline at 1800 777 808.
Many factors impact your blood sugars around mealtimes, including the timing of your boluses, and the type of food you are eating. If you are noticing high blood sugars or low blood sugars around mealtimes, please consult with your healthcare team to evaluate your overall settings.
Use this handy worksheet. Or upload your pump settings to CareLink™ Personal and then print or save an electronic copy of the Device Settings page.
Training resources are available through our online training portal located on our website at https://medtronic-diabetes-ap.docebosaas.com/learn. Your email address is your username, and the temporary password is “mylearning”. You can also find additional training videos at https://medtronic-diabetes-ap.docebosaas.com/learn.
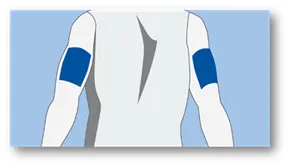
The best place to insert your Guardian™ 4 sensor is in the back of the upper arm. Wearing it there plays a big part in providing the best possible experience when it comes to sensor life. It may be a little challenging inserting the sensor in the arm on your own, so please watch this video here. You may need to ask someone to help you.
The Guardian™ 4 sensor is also indicated to be inserted in these locations:
- Ages 7-17 years old: Back of the upper arm plus the upper buttocks
- Ages 18 years and older: Back of the upper arm plus the abdomen
It is important when selecting a site for your sensor to consider these points:
- Avoid the 5.0 cm area around your belly button
- Avoid where your body naturally bends a great deal
- Avoid areas where clothing might cause irritation (e.g. your beltline)
- Avoid scarred, hardened tissue, stretch marks and tattoos
If bleeding occurs after sensor insertion, do the following:
- Apply steady pressure, using sterile gauze or a clean cloth placed on top of the sensor, for up to 3 minutes. The use of unsterile gauze may cause a site infection.
- If bleeding stops within 3 minutes, connect the transmitter to the sensor. If bleeding continues, do not connect the transmitter to the sensor because blood can get into the transmitter connectors, and could damage the device.
If bleeding continues, causes excessive pain or discomfort, or is significantly visible in the plastic base of the sensor, do the following:
- Remove the sensor and discard it.
- Check the site for redness, bleeding, irritation, pain, tenderness, or inflammation. Treat based on instructions from your healthcare team.
- Insert a new sensor in a different location.
- Request a replacement sensor.
Learn about sensor glucose versus blood glucose.
It is recommended that you remove your sensor and transmitter to avoid any damage when having an X-ray/CT scan/MRI. You do not need to remove them for an Ultrasound. Once the test is complete, you can insert a new sensor.
After the transmitter and sensor are connected, they form a waterproof seal to a depth of 2.4m for 30 minutes. As most swimming is at the surface level, you do not need to remove them. Please note that when you are below surface level, sensor readings may not be transmitted from the sensor to the pump.
The Suspend before Low feature is available in Manual Mode when you are wearing a sensor. Suspend before Low will temporarily suspend insulin delivery if your sensor glucose (SG) is falling and predicted to be approaching your low limit in 30 minutes. This will keep you from getting additional insulin that would continue to lower your SG level. Even though you are likely to be in SmartGuard™ most of the time, it is important to have this feature turned on in the background. This means that if you do exit SmartGuard™, and your levels are heading low, Manual Mode is still able to stop insulin delivery before you go too low.
When you are using the MiniMed™ 780G system with the Guardian™ 4 sensor, you do not need to calibrate. However, the system is designed to use every blood glucose (BG) meter reading either entered manually or received from a glucose meter to calibrate the sensor. The BG meter reading must be between 2.8 and 22.2mmol/L to calibrate.
- Please note that the Guardian™ 4 sensor does not require regular calibrations, but it may request a calibration to check sensor performance.
- If you are still using the Guardian™ sensor 3, you will need to do a calibration BG check at least every 12 hours. Please follow the next practice suggestions below.
- Try not to calibrate with multiple BG meters. It’s best to stick to the same meter for all your calibrations.
- Wash your hands and dry them before checking your BG.
- Enter the BG reading into the pump/phone app straightaway. Don’t use old BG meter readings or previous sensor readings as a calibration.
- If your system requires a second calibration, wait at least an hour to repeat the calibration. This is because your levels may be changing rapidly, so you need to give them time to settle.
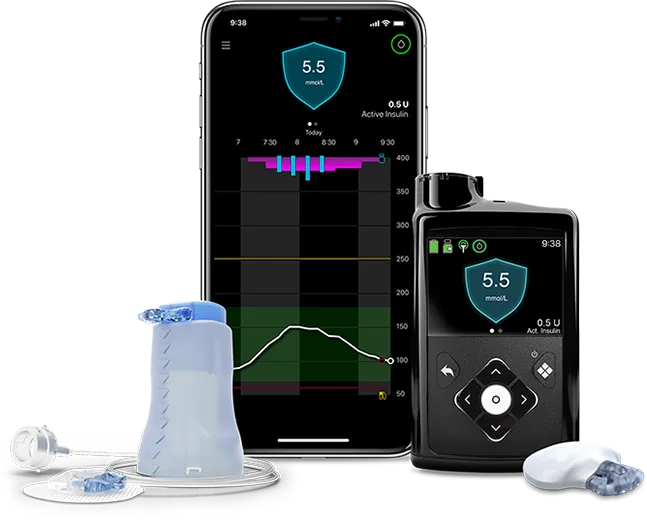
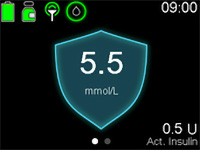
The sensor graph provides current SG reading information that is transmitted to the pump. If the MiniMed™ Mobile app is in use, the sensor graph can be viewed on a mobile device. For a detailed explanation of the icons, review the Manual Mode (page 100) and SmartGuard™ technology (page 134) in the system user guide.
The best place to insert your Guardian™ 4 sensor is in the back of the upper arm. Wearing it there plays a big part in providing the best possible experience when it comes to sensor life. It may be a little challenging inserting the sensor in the arm on your own, so please watch this video here. You may need to ask someone to help you.
The Guardian™ 4 sensor is also indicated to be inserted in these locations:
- Ages 7-17 years old: Back of the upper arm plus the upper buttocks
- Ages 18 years and older: Back of the upper arm plus the abdomen
It is important when selecting a site for your sensor to consider these points:
- Avoid the 5.0 cm area around your belly button
- Avoid where your body naturally bends a great deal
- Avoid areas where clothing might cause irritation (e.g. your beltline)
- Avoid scarred, hardened tissue, stretch marks and tattoos
Here are some things you can try to help get up to 7 days wear out of your sensor:
- Make sure to follow the steps for skin preparation for the user guide to set up your sensor for success.
- Be sure you are wearing your sensor in an indicated location. Make sure you aren’t inserting the sensor into muscle, scar tissue, or areas that experience a lot of movement. If you need additional help, ask a care partner for assistance, or stand in front of a mirror. Please contact your local Medtronic Clinical Specialist for support. If you don’t have the details of your local Clinical Specialist, please contact the Global Helpline on 1800 777 808 and they can put you in touch.
- Make sure to use two pieces of oval tape so that they are covering the sensor base and the transmitter. Follow these taping instructions. Incorrect taping is one of the most common reasons why sensors won’t stay in place.
- Try using a liquid adhesive to help your tape stick for longer. Make sure to apply the extra adhesive after you insert the sensor, and before you put the tape on, especially if you are active or in a warm, humid climate.
Watch this video for tips to improve your sensor experience.
We have a recommended method for taping that we have found is effective for most people who wear CGM. It requires you to use both pieces of oval tape that are supplied with your sensor. Some people also use an additional layer of tape called overtape. Click here to learn how to tape and use extra adhesives.
Check out this guide to help with additional site management. Check with your healthcare team or your Medtronic Clinical Specialist about solutions that may be best for you.
Please click here for suggestions to clean your transmitter
Please contact your local Medtronic Clinical Specialist. If you don’t know them, please contact the Global Helpline at 1800 777 808 and they can put you in contact with them.
If you need more information, please contact the Global Helpline on 1800 777 808. Here are some suggestions you may like to try to improve the situation yourself.
Check out this Sensor Alerts Quick Reference Guide to learn about the most common alarms and how to clear them.
The Alert Silence feature silences certain sensor alerts for a set period. Learn how to silence your glucose alerts.
Alerts with the system are customisable. Be sure to work with your healthcare team who can help you determine how to optimise your settings.
Learn more on how to adjust your low settings.
Learn more on how to adjust your high settings.
The best place to insert your Guardian™ 4 sensor is in the back of the upper arm. Wearing it there plays a big part in providing the best possible experience when it comes to sensor life. It may be a little challenging inserting the sensor in the arm on your own, so please watch this video here. You may need to ask someone to help you.
The Guardian™ 4 sensor is also indicated to be inserted in these locations:
- Ages 7-17 years old: Back of the upper arm plus the upper buttocks
- Ages 18 years and older: Back of the upper arm plus the abdomen
It is important when selecting a site for your sensor to consider these points:
- Avoid the 5.0 cm area around your belly button
- Avoid where your body naturally bends a great deal
- Avoid areas where clothing might cause irritation (e.g. your beltline)
- Avoid scarred, hardened tissue, stretch marks and tattoos
Watch this video to learn how to insert the Guardian™ 4 sensor.
The Guardian™ 4 sensor does not require fingersticks for calibration. However, every BG reading confirmed in the pump is used to calibrate the sensor. Additionally, entering a BG reading from a BG meter as desired will not negatively impact the system. Please note: the system requires a BG reading to enter SmartGuard™ technology for the first time or after an exit, and the system may require a BG reading from time to time to stay in automation.
- Location, location, location. Where you insert your sensor can make a big difference. In fact, it's best to choose a flat area on the back of your upper arm where you can "pinch an inch" that's also free of scar tissue.
- Ask for a helping hand. If you need extra support with sensor insertion on the back of your upper arm: ask a buddy for help; stand in front of a mirror or refer to Medtronic online resources.
- Make it stick. If additional tape isn't enough, consider using an optional skin adhesive. The key here is to use it after you insert the sensor but before you apply the first oval tape. We also recommend making sure that the sensor base and transmitter are covered with two pieces of tape. If additional tape is needed, you can add it on top.
- Do not fear if “Sensor Updating” appears! This is a safety feature that's most likely to happen on the first day. There's nothing you need to do unless your pump alerts you. Most of the time, it resolves on its own in an hour. But if it lasts for more than 3 hours, replace the sensor, and get in touch with Medtronic for help.
- Remember that the algorithm has your back. All boluses (meals and corrections) are analysed by the algorithm to assess for safety before being delivered. If you're experiencing highs after meals, consider bolus timing and talk to your healthcare team about your carb ratio.
The Guardian™ 4 sensor does not require fingersticks for calibration*. However, every BG reading confirmed on the pump is used to calibrate the sensor. Additionally, if you feel the need to do a fingerstick, and enter that BG reading in the pump, it will not negatively impact the system. Please note: the system requires a BG reading to enter SmartGuard™ technology for the first time and may require an additional BG reading from time to time to stay in automation.
Data shows that using the back of the arm gives the best results for sensor life compared with other site. This is because there is less movement compared to the abdomen and upper buttocks. In addition, there is less chance of scar tissue in the back of the arm. Many people with Type 1 Diabetes, have scar tissue from injecting is areas like the abdomen. We do understand that inserting in the arm, can be difficult for some. If you can get someone to assist you, that is great, but if you can’t please watch this video which shows you how you can insert the sensor in the arm, on your own.
Watch for bleeding at the insertion site (under, around, or on top of the sensor). If bleeding occurs, do the following:
- Apply steady pressure, using sterile gauze or a clean cloth placed on top of the sensor, for up to three minutes. The use of unsterile gauze can cause site infection
- If bleeding stops, connect the transmitter to the sensor. If bleeding does not stop, do not connect the transmitter to the sensor because blood can get into the transmitter connector, and may damage the device.
If bleeding continues, causes excessive pain or discomfort, or blood is significantly visible in the plastic base of the sensor, do the following:
- Remove the sensor and continue to apply steady pressure until the bleeding stops. Discard the sensor in a sharps container.
- Check the site for redness, bleeding, irritation, pain, tenderness, or inflammation. Treat based on instructions from a healthcare professional.
- Insert a new sensor in a different location.
For tips on how to help with bleeding, please click here for out Sensor Tips guide.
Firstly, if a sensor has fallen off, or failed to stick, please click here for detailed Sensor Tips.
Make sure to always clean your skin with an alcohol swab and to make sure the skin is dry. Do not insert a sensor where you have used a body lotion or other creams that may affect how well the sensor adheres. Also, once you insert the sensor, do not remove the inserter for 10 seconds to give the sensor adhesive time to stick to your body. Always use the supplied oval tape to ensure the sensor is secure.
CGM alerts at night may be caused by a few different reasons ranging from sensor insertion to site placement. Here are a few tips to help prevent getting CGM alerts in the middle of the night.
- Sensor insertion, sensor placement, and taping make a difference. For your sensor to work at its best, avoid sites where clothing may rub or constrict, where your body naturally bends which may cause the sensor to pull out and where there is a lot of pressure. Follow instructions for how to insert the Guardian™ 4 sensor.
- Check your pump’s home screen before going to bed. If you are using SmartGuard™ technology, make sure you see the blue shield.
- Customise nighttime alert settings. Talk to your healthcare team about your alerts overnight to make sure they are personalised to meet your needs. You may consider setting alerts differently for the overnight period.
- Consider the Alert Silence feature. Your pump has feature called Alert Silence, where you can temporarily silence alerts. Don’t worry, you will still get important alerts if Alert Silence is ON. For your safety, Low SG of 3.0mmol/L or below, and High SG of 13.9mmol/L or higher for more than 3 hours will always sound. Learn how to set alert silence.
Now that the Guardian™ 4 sensor does not require calibrations, additional signal checks were put in place to assess sensor reliability. The “Sensor Updating” message may occur on the pump screen when the system indicates sensor performance needs careful monitoring. Most sensors resume normal function, so there is no need to take action unless recommended by the system. If the updating lasts for more than 3 hours, the recommendation is to replace the sensor to maximise time in SmartGuard™ technology.
Understanding the Sensor Updating alert.
Watch this video for tips to improve your sensor experience 
Requesting a sensor replacement online.
The Change Sensor alert can occur for a few reasons such as the sensor was not fully inserted, the sensor is not working properly or that 2 Calibration BGs have been entered in the pump and both have not been accepted by the system. In all cases, you will need to insert a new sensor, but for more details, please click here.
Please click here for more information.
SmartGuard™ technology is an advanced algorithm that uses current and past glucose level trends from your CGM data to anticipate, adjust and correct insulin delivery every 5 minutes. If your glucose levels are trending high, the system automatically gives you more insulin. If your glucose levels are trending low, the system automatically reduces the amount of insulin delivered. More importantly, if you occasionally forget to give yourself a meal dose‡ and you are trending high, the system automatically delivers a correction dose to help bring you back to target.
If you are starting on a new MiniMed™ 780G insulin pump (hardware) or upgrading from an older MiniMed™ insulin pump to a brand-new hardware, you will have a 48-hour SmartGuard™ warm-up period before being able to enter SmartGuard™ technology. The 48-hours begins at the first midnight after you start the pump for the first time.
If you are upgrading your MiniMed™ 770G insulin pump via the Software Upgrade, there is a 5-hour warm-up period before you can enter SmartGuard™ technology.
In both situations, you will need to do a fingerstick and enter the BG reading into the pump for SmartGuard™ to start.
If you want more information about what to do while you are in SmartGuard™ warmup, please click here.
There can be a few reasons why you are not in SmartGuard™ so the best way to check this is to look at the SmartGuard™ checklist here.
While you are in SmartGuard™ warm up, you will be in Manual Mode. Click here for a guide to the Top 5 Tips while you are in SmartGuard™ warm up.
Auto corrections are delivered when two conditions are met: maximum auto basal delivery has been reached and the sensor glucose is above 6.7mmol/L.
Consider the time of your boluses and work with your healthcare team to ensure your carb entries are correct and your carb ratios are correct. For some general guidelines about managing high glucose levels, please click here.
Yes. Taking a bolus before meals help to keep glucose levels in range after eating by helping the insulin match the rise in glucose. That said, when in SmartGuard™ technology, the pump will deliver auto correction doses every 5 minutes if needed without user interaction. This can be particularly helpful if you miscalculate your carb counts or occasionally miss a meal bolus.
A user-initiated correction will allow you to deliver a correction bolus as needed to bring down a glucose level that is out of range. In SmartGuard™ you can deliver a “user-initiated correction” by pressing the down button to the Bolus Wizard™ screen. The current sensor glucose (SG) will be displayed. Continue to press select until you see “Deliver Bolus”. If the system requires a correction, you will be able to do that now. In SmartGuard™ you can also use a meter BG reading to do a user-initiated correction. Simply enter a BG reading into the Bolus Wizard™ screen, then follow the same process that you do for any bolus but not enter carbs if you are not eating.
The system can only track carbohydrates that are entered into the pump. For hypo treatment, please follow your healthcare team’s advice. General guidelines state that for mild or moderate hypo treatment, you should not enter these carbs into the pump. For more information on treating and preventing low glucose levels in SmartGuard™, please click here.
SmartGuard™ technology does not use the manual mode programmed basal rates to determine auto basal delivery. Instead, the algorithm makes a new decision every 5 minutes and will adjust the basal delivery based off the sensor glucose values. The programmed settings that SmartGuard™ technology does use include the insulin to carb ratios, active insulin time and the SmartGuard™ auto basal target.
If the system sees that the sensor glucose is falling it will decrease the insulin being delivered and/or stop insulin from being delivered. However, it is important that you eat the amount of carbohydrates that you bolused for because the bolus insulin you gave will already be working in your body.
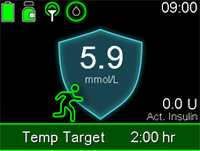
You can set a temporary sensor glucose target (Temp Target) of 8.3mmol/L for situations when less insulin is needed, such as exercise. This can be set to as little as 30 minutes and up to 24 hours in 30-minute increments. After the programmed time, if not cancelled early, the pump will automatically revert to using the programmed SmartGuard™ auto basal target. The general recommendation is to start the Temp Target 1-2 hours before beginning exercise or activity and programming it to stop at the end of the activity. If the activity ends early, you can always cancel it. Check with your healthcare team for specific guidelines that will suit you and the activity you are doing. For instructions to set a Temp Target, please click here.
What does the pump screen look like when the Temp Target is active?
The SmartGuard™ Meal Bolus is a safety feature that looks at every meal bolus entered and predicts whether it could cause hypoglycaemia over the following 4 hours. In these cases, the meal bolus is reduced to the largest amount not predicted to cause a low which may differ from what you would calculate. The SmartGuard™ Meal Bolus feature considers glucose trends, current glucose level, insulin on board (which includes recent meal boluses, auto and user-initiated corrections as well as auto basal delivery) and carbs entered.
Consider the timing of your boluses especially in the evening. Work with your healthcare team to ensure your settings are appropriate. In some cases, using the Temp Target may help.
The system will deliver up to 8% of the total daily insulin dose as auto correction within a 45-minute period. if you notice you are not receiving auto corrections, you can deliver a correction yourself using a BG reading. Once the criteria are met for auto corrections to occur, they will start delivering.
It is not recommended to use fake carbs on the MiniMed™ 780g system. The system algorithm is stronger than previous systems and entering fake carbs may increase your risk for hypos. Click here for more information.
You cannot deliver a dual or square wave bolus in SmartGuard™ technology. The system is designed to compensate for a delayed rise in sensor levels due to high fat, high carb meals. The auto basal adjustments every 5 minutes and auto corrections every 5 minutes may eliminate the need for using the dual or square wave bolus.
If you forget to bolus for a meal and you remember within 30 minutes of starting your meal you can still deliver a bolus, however, only enter 50% of the carbs that you have consumed. If 30 minutes have passed or you are unsure how long it has been since you started eating, it is not recommended to do a food bolus but instead deliver a user-initiated correction bolus if your glucose level is high. Please note that when you forget to bolus for a meal, your auto basal will increase and as soon as it reaches maximum delivery, and your glucose is at 6.7mmol/L or higher, auto corrections will start to be delivered every 5 minutes, if needed, to help get your levels back to target. Click here for more information.
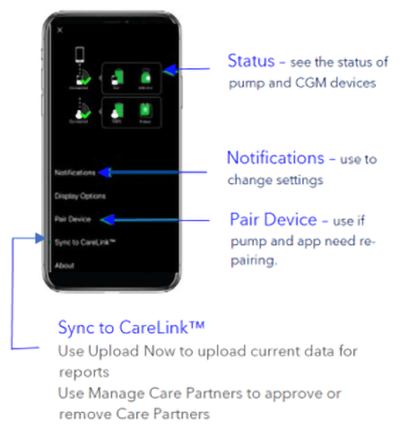
You will see a blue shield on the home screen of your pump. You can also go into your status menu.
For specific recommendations you should discuss your exercise needs with your healthcare team. There are many different types of exercise, and everyone responds differently. For general guidelines, please click here.
If you glucose levels are unexpectedly high, please follow your High Glucose management plan that you healthcare team will have given you.
If you are unsure, please contact your healthcare team for support. For general guidelines for preventing and treating highs, please click here.
Yes! Please click here for a handy guide.
- A compatible smartphone. Check our app compatibility list
- MiniMed™ 780G pump needs to be within 6m from your smartphone
- The app needs to be open, in the foreground or background
- Bluetooth® connection needs to be active
Before updating your smartphone’s operating system, we recommend you check our app compatibility list.
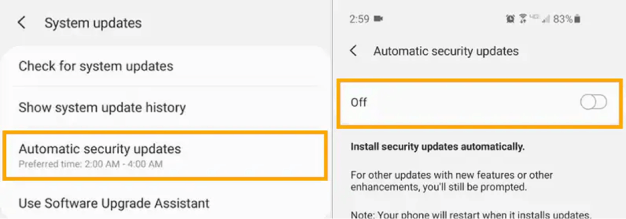
To ensure your device will continue to be compatible when new operating systems are released by Apple® or Android™, we recommend that you disable automatic OS updates so you can manually update your operating system after verifying our compatibility list on our website.
Review instructions for setting up the MiniMed™ Mobile app and check out this Quick Reference Guide.
Click here to view the guide
If you don’t have a compatible smartphone, you will be able to continue using your MiniMed™ 780G but will not be able to use the app. You can use the regular pump screen for viewing data and use the Blue Adapter for manual uploading of your system data into CareLink™ Personal.
The following are required for your data to automatically upload to CareLink™ software:
- Internet and Bluetooth® connection
- Sync to CareLink™ option turned ON
- Stay logged into the CareLink™ software (check once week to make sure you are logged in)
- Keep the app open (either in the foreground or perform Upload Now whenever you want to upload your pump data to CareLink™ software)
- Click here for more information
From the settings menu, go to General, then go to Software Update and set Automatic Updates to the “OFF” position.

Form the System updates menu, select Automatic security updates to “OFF”.
The MiniMed™ Mobile app (Version 2.1 or higher) is also compatible with Apple® Watch. You can monitor your values on your watch face or tap to enter the app. You must connect your Apple® Watch with your compatible iPhone® device to get alerts and notifications on your watch. The watch communicates with the iPhone® device, not the insulin pump, so if your iPhone® device is out of range, you will not get updated glucose information on your watch. Review these instructions for how to install the MiniMed™ Mobile App on your compatible Apple® Watch.
The pump and app will be in search mode when they are far apart. Search mode may impact battery levels.
To prevent this, we recommend you keep the pump and smartphone within 6m of each other.
Yes! Please click here for a handy guide.
When using the MiniMed™ Mobile app, up to five care partners can view and receive alerts the CareLink™ Connect app.
The pump user needs to manually provide a CareLink™ Personal username to their care partners and accept their care partner’s request to follow.
Check out this Quick Reference Guide for step by step instructions.
Yes, care partners adjust notifications and alarms in the CareLink™ Connect app. Also depending on the phone’s operating system, care partners can control how and when they appear. Click here to learn how to personalise notifications.
Yes, they can follow up to five MiniMed™ Mobile app users. Click here to learn how to follow multiple users.
To view up to date data, the CareLink™ Connect app user must be logged in and have internet connection on their phone. In addition, the MiniMed™ Mobile app user must have:
- Their pump and phone in range (less than 6m)
- Their phone must be connected to the internet
- Sync to CareLink™ feature must be turned ON
- Be logged into CareLink™ Personal on the app
The CareLink™ Connect app Home Screen will indicate when data was last uploaded.
Check out the CareLink™ Connect app Quick Reference Guide for more information and tips to improve connectivity.
Click here to learn how to create a CareLink™ Personal account.
The CareLink™ uploader allows you to upload data from your pump into the CareLink™ Personal system manually as opposed to using the MiniMed™ Mobile app. You must have a Blue Adapter to perform this function. Having the latest version of the Uploader installed on your computer provides the most optimal upload experience. Review instructions on how to install the latest version of the CareLink™ Uploader.
The MiniMed™ Mobile app can sync data to CareLink™ software automatically or manually.
The Sync to CareLink™ feature automatically sends data from the MiniMed™ Mobile app to the corresponding CareLink™ account approximately every 5 minutes. The feature also automatically sends data used to create CareLink™ reports approximately every 24 hour. Learn how to set up this feature.
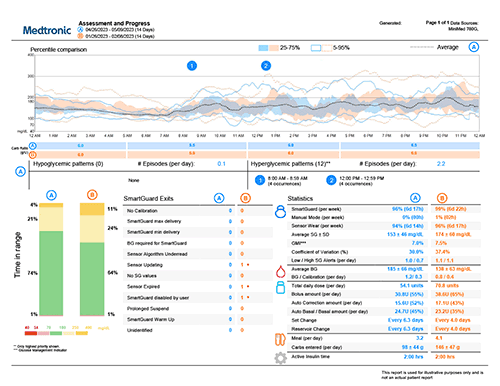
The Assessment and Progress report is designed to help you view your glucose management while on your MiniMed™ 780G system. You can use this report with your healthcare team to improve the duration of time spent in SmartGuard™ technology. Please click here for a guide to read this report.
Yes, you can share your data with your healthcare team.
In order to link with them, you will need to link your account with theirs. To do so, simply give them your username, your name, date of birth and the email address you used to register for CareLink™ Personal. They will set you up in their system and you will receive an email from CareLink™ software requesting your permission to link to their CareLink™ system account. There is no need to give them your password.
If you change healthcare teams, you can log into your CareLink™ Personal account, click on Data Sharing, then Clinic Sharing. Here you will be able to revoke their access to your data.
If you have forgotten your CareLink Personal username and/or password, here are the steps you can do online to recover your details. Please click here to obtain the instructions. Please note that you will not be able to create a new CareLink™ Personal account with the same email address. Please call the Global Helpline on 1800 777 808 for assistance.
Check out the upload guide for easy steps on how to upload your pump data with the Blue Adapter.
When in SmartGuard™ technology, you can choose to use a target of 5.5 (default), 6.1 or 6.7mmol/L and you can temporarily change your target to 8.3mmol/L. The Temp Target feature is designed for any time you want less background insulin. In addition to exercise, this may include gardening, times of high stress, exams, driving, or drinking alcohol. Every person is different, but in general you could start the Temp Target 1-2hours before the activity and end it 1-2hours after the activity has ended. During the time the Temp Target is active, auto corrections will not be delivered.
If you find you are still dropping low during exercise, you may need to consider a combination of suspending your pump and/or consuming carbs to avoid the low altogether.
Check out these exercise tips but please discuss exercise with your healthcare team.
Summer is a time for fun, adventure, and making memories, and with the right tips, you can enjoy it to the fullest while managing your diabetes. Whether you’re planning to lounge by the pool, travel to new destinations, or explore the outdoors, staying prepared is key. Check out our handy summertime tips here.
Every individual responds differently to activity and there are many different types of activity. However, in general, it is recommended to supplement with 10 grams of carbohydrate if your glucose level is less than 7.0mmol/L and 10-20 grams of carbohydrate if your glucose level is less than 5.0mmol/L (for aerobic activity). DO NOT EXERCISE if your glucose level is less than 3.9mmol/L or greater than 15mmol/L or if you have ketones >1.5mmol/L. It is always recommended to consult with your healthcare team around individualised recommendations.
We recommend ordering new supplies when you open your last box of sensors or infusion sets. All supplies are obtained from your local pharmacy using your NDSS details.
The Travel Loaner Program allows Australian residents to take a “back-up” insulin pump for up to 90 days when they leave Australia. There is a fee of $50 for this program.
Complete the Travel Loaner form and submit it at least 2 weeks before you leave to ensure on-time delivery. The routine hassle of travel, including stress, changes in time zones, schedules and activity levels, mealtimes, and types of food, can all affect your diabetes. Be extra attentive to monitoring your levels and be prepared to respond quickly if required.
Pack extras of everything – insulin, infusion sets, sensors, reservoirs, alcohol swabs, sensor tapes, extra compatible batteries for your pump and transmitter charger and even back up pens in cases of emergency. Check out our handy travel checklist here.
To access the NDSS and Diabetes Australia Travel Fact Sheet with recommendations, click here.
Watch this video for tips for traveling by air with your Medtronic insulin pump